
A high-speed collision on a busy freeway or interstate is one of the most jarring experiences a driver can encounter. In the immediate aftermath, adrenaline surges, noise levels peak, and confusion can quickly paralyze decision-making. However, the actions taken in the first 600 seconds—the initial ten minutes—are critical. They determine whether secondary accidents occur, how quickly medical aid arrives, and how well injury severity is mitigated.
Navigating these crucial moments requires a structured, calm approach. This comprehensive guide outlines the exact step-by-step emergency response sequence you must follow to preserve life, secure the scene, and ensure high-speed traffic safety after a highway crash.
Phase 1: Minutes 1–3 — Immediate Scene Safety and Hazard Mitigation
The immediate hazard after a high-speed highway impact is not always the initial crash itself, but the oncoming traffic moving at 65 mph or faster. Secondary collisions regularly cause more severe casualties than primary impacts. Your top priority during the first three minutes is establishing immediate scene safety.
1. Stop the Vehicle and Engage Warning Systems
If your vehicle is still operational, drive or coast it onto the right shoulder or into a emergency turnout bay. If the vehicle is disabled in live lanes, do not attempt to push it. Turn off the ignition immediately to reduce fire risk from hot exhaust systems or damaged fuel lines, and turn on your hazard lights instantly to alert oncoming drivers.
2. Assess Immediate Environmental Hazards
Before unbuckling your seatbelt or opening any door, look around carefully. Check for:
- Smoke or Fire: Look for flames near the engine bay or undercarriage.
- Fuel Spills: Listen or look for leaking gasoline or diesel fuel.
- Downed Power Lines: Never exit a vehicle touching live electrical wires.
- Oncoming High-Speed Traffic: Look through side mirrors before opening doors.
3. Safe Vehicle Evacuation
If the car is in a live traffic lane and moving traffic persists, exiting can be extremely dangerous. However, if staying in the vehicle presents an immediate fire hazard, exit carefully from the side facing away from live traffic. Move immediately behind a concrete barrier, guardrail, or high embankment. If you are stopped safely on a wide shoulder, exit via the passenger side door to avoid stepping into the active roadway.
Phase 2: Minutes 3–5 — Triage Assessment and Emergency Contact
Once you are in a safe position, shift your focus to evaluating health conditions and notifying emergency dispatchers. Time is critical when dealing with potential internal trauma or severe bleeding.
1. Perform Rapid Injury Triage
Assess yourself and your passengers for injuries. Check for responsiveness, breathing difficulties, or severe hemorrhaging. When inspecting victims, observe key rules of emergency response:
- Do Not Move Injured Persons: Unless there is an imminent threat of fire or explosion, do not attempt to pull an injured passenger out of the vehicle. Unnecessary movement can cause permanent paralysis in spinal cord injuries.
- Control Severe Bleeding: Apply firm, direct pressure to heavy bleeding wounds using clean cloth, clothing, or first-aid supplies.
2. Place the Emergency 911 Call
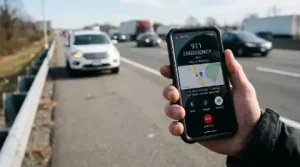
Dial 911 or your local emergency dispatch service immediately. When speaking with the operator, provide precise, structured information:
- Exact Location: State the highway number, direction of travel (e.g., I-95 South), mile marker, or nearest exit ramp. If unsure, use navigation apps to obtain exact GPS coordinates.
- Incident Details: State the number of vehicles involved and whether lanes are blocked.
- Casualty Count and Status: Detail how many people are injured, their conscious state, and whether anyone is trapped inside a vehicle.
For additional details on emergency protocol standards, consult official guidelines provided by the National Highway Traffic Safety Administration.
Phase 3: Minutes 5–8 — Securing the Crash Perimeter
While waiting for first responders, you must signal to approaching vehicles that a major hazard lies ahead. Securing the crash perimeter prevents chain-reaction collisions and creates a safety buffer around injured individuals.
1. Deploy Warning Signals (If Safe to Do So)
If you have emergency warning devices in your trunk—such as reflective triangles or electronic LED flares—deploy them behind your vehicle. Place the first marker roughly 100 to 200 feet back from the collision site along the shoulder to give oncoming motorists adequate distance to slow down or change lanes.
Safety Warning: Never walk onto active traffic lanes to place flares. Only deploy devices along the highway shoulder or behind protective barriers.
2. Prevent Secondary Ignition Hazards
Ensure that no one lights cigarettes or creates sparks anywhere near the crash site. Gasoline vapors are invisible and can travel along the pavement, creating a volatile explosion hazard.
3. Coordinate with Other Drivers Involved
If other motorists are involved and mobile, instruct everyone to stay behind the guardrail or concrete barrier. Discourage standing on the shoulder between or directly in front of parked cars, as a secondary rear-end strike can crush pedestrians caught between vehicles. Review American Red Cross first aid guides to stay informed on basic scene safety practices.
Phase 4: Minutes 8–10 — Scene Documentation and First Responder Handoff
As police cruisers, fire engines, and ambulances approach, prepare for a smooth handoff while ensuring essential accident documentation is initiated.
1. Assist Arriving Emergency Vehicles
Make yourself visible to incoming first responders by waving a bright cloth or flashlight if it is dark. Keep the roadway clear so emergency vehicles can maneuver directly to the crash site without obstruction.
2. Deliver a Concise Verbal Report
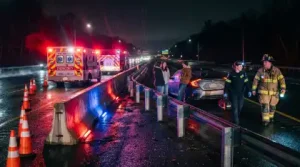
When the lead paramedic or police officer arrives, provide a brief, clear summary:
- Number of occupants in each vehicle.
- Observed injuries or medical concerns.
- Any potential hazards noted (e.g., fuel leakage, battery sparks).
3. Safe Scene Documentation
Once medical needs are managed and police have secured the traffic zone, begin documenting the scene for insurance and legal records. Take photos of vehicle damage, license plates, skid marks, road conditions, and overall site layout. Acquire names and contact details of witnesses before they leave the scene.